
Spring Cleaning: Organization Tips for a Functional Kitchen
The kitchen is truly the heart of the home. From family homework sessions to casual wine nights with friends, it’s where life happens. With spring in the air, it’s the perfect time to tackle spring cleaning and organize your kitchen for maximum efficiency and calm. At SimplyOrganized, we help Glenview and North Shore Chicago homeowners create functional, clutter-free kitchens that spark joy every day.
Step 1: Declutter Your Kitchen

Start by decluttering each cabinet and drawer one at a time. Remove items you rarely use or those designed for a single purpose. Ask yourself: Do I really need that strawberry huller or oversized potato masher? Clearing unnecessary items is the first step toward a functional and organized kitchen.
Step 2: Consolidate and Purge
Group like items together: utensils, dishes, pots, pans, and gadgets. Purge duplicates or items you haven’t used in the past year. This step ensures that your kitchen contains only what you need and love.
Step 3: Gather Items from Other Areas
Check basements, garages, or closets for kitchen items that may have been stored away. Rehome toys, office supplies, or miscellaneous items that have crept into your kitchen. Doing so opens up valuable space.
Step 4: Plan with Post-It Notes
Use Post-it notes to visualize where each category of items should live. Place everyday utensils near the dishwasher or eating area, and keep your coffee station organized with mugs and coffee supplies close at hand. This planning stage allows flexibility and prevents last-minute clutter.
Step 5: Organize Pots, Pans, and Lids
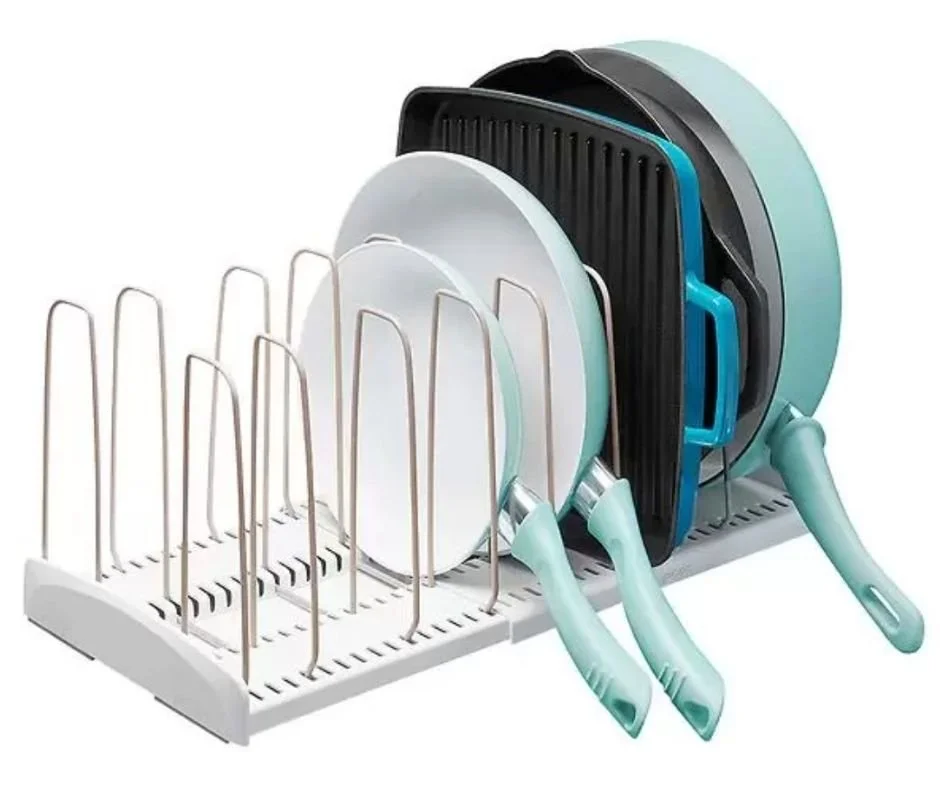
Store pots and pans near the cooktop for easy access. Use drawer organizers or mounted cabinet door racks to keep lids and pans tidy. Pull-out solutions can make heavy or deep cabinets more functional. We love these organizers from The Container Store:
Step 6: Drawer Organization for Water Bottles and Food Storage
Store water bottles horizontally in a drawer with dividers. Similarly, use bins and dividers for food storage containers and their lids. This keeps items accessible and prevents frustration during daily use.
Step 7: Turntables Are Your Friends
Turntables are ideal for oils, vinegars, and spices, allowing you to see all items without moving or knocking anything over. They maximize accessibility and efficiency.
Step 8. Maximize Vertical Space
Use shelf risers and under-shelf storage to create extra layers for plates, napkins, or vitamins. Maximizing vertical space can nearly double your cabinet storage capacity.
Step 9: Create a Kitchen Drop Zone
Designate a shallow basket or tray near the entry for mail, keys, and other daily items. Go through it daily to keep your countertops clear and maintain organization.
Imagine Your Kitchen Decluttered and Functional
Organizing your kitchen doesn’t have to be overwhelming. By decluttering, consolidating, and assigning a home for every item, you can create a space that’s both functional and beautiful. A well-organized kitchen saves time, reduces stress, and elevates daily life.
As a professional home organizer in Glenview and Chicago’s North Shore, SimplyOrganized has helped countless families reclaim their kitchens and their time. Start your spring cleaning today and enjoy the benefits of an organized kitchen all year long.